Pentesting Tutorial Part 3 - Vulnerability Scanning and Authentication
Backtrack, Nessus, and Hydra
This tutorial will be the continuation of the pentesting series. I will cover how to perform vulerability scans, and check for weak passwords.
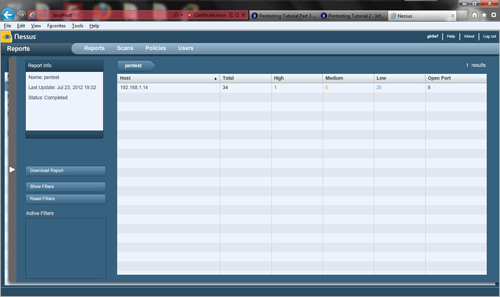
There are many vulnerability scanners out there, so which one should I use you might ask? Personally, I use Nessus! There are many reasons for this my personal preference is to use Core Impact, but it is really expensive. I am resourceful and use what I have available, in this case it is the free version of Nessus. You are probably also asking why would you use a vulnerability scanner when such a tool creates a lot of noise on the network? It is very simple. The job of a penetration tester is to be as thorough as possible, uncovering as many holes as they can find. Vulnerability scanners are not always 100% their main purpose is to find the obvious and supply patch info and vulnerability information. It is always a must to verify each vulnerability found before marking it as a positive result. Let's begin. I already have Nessus installed, so I will go ahead and log into the server via the browser. I will set up a new scan policy, making sure all vulnerabilities are checked. We already know the open ports, to speed up the scan, I have unchecked port scans. I give the policy a name and submit it. Next, click on scans, then add. Now you will see a window pop up. Give the scan a name , set the policy to that in which you just created, add your target (in this case we will use .14). Then click launch scan. This will take a while, so sit back and relax. As you can see from the images, the scan results are pretty easy to figure out. As you can see, the scan found one vulnerability that was marked as high. This vulnerability needs to be verified before it is marked as a positive result.
If we click on the right where it says 192.168.1.14, it will give us more information.
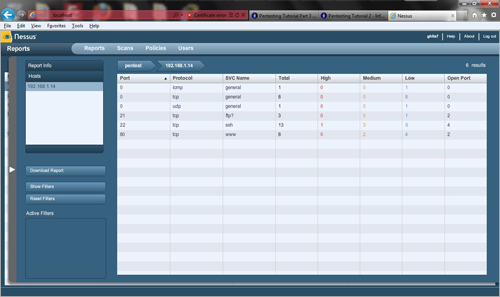
There is a lot of information in the scan report, I would suggest poking around and looking at all of the results. The one that I am interested in is the one marked as high, so I am going to click on this one and see what it says.
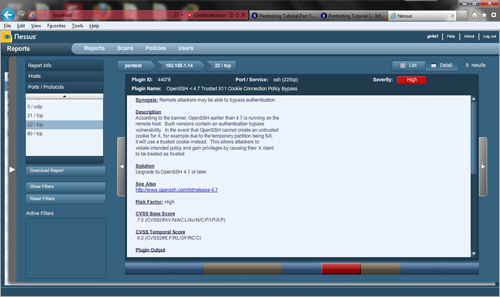
As you can see the server is running outdated software and it is suggested that it is upgraded to a newer version. One thing that it did not show us is the ftp server running with anonymous access enabled. Usually they will tell you, this time it didn't. This is exactly why you need to gather as much information as you can about the target systems, and then verify that the vulnerability exists. Automated scanners are not always 100% and it is the responsibility of the pentester to verify. There is also another vulnerability that you will find out about later in the exploitation module that the scanner did not detect. One thing that should be mentioned is that Nessus scan results can be saved in nbe format. This is useful if one wants to use these scan results with Metasploit. The metasploit module db_autopwn will import, read these results and then auto exploit any vulnerabilities that it finds. I personally would rather test it myself  . So I will not include the db_autopwn module in these tutorials. Now, let's move on to authentication. My favorite brute forcing tool is Hydra! Why? It is fast, and can scan all ports that allow for login. This can save the tester a lot of time. The syntax for Hydra is as follows
hydra [[[-l LOGIN|-L FILE] [-p PASS|-P FILE]] | [-C FILE]] [-e ns] [-o FILE] [-t TASKS] [-M FILE [-T TASKS]] [-w TIME] [-f] [-s PORT] [-S] [-vV]
[-4|-6] [-x MIN:MAX:CHARSET] [server service [OPT]]|[service://server[:PORT][/OPT]]
We will be using the username list that we grabbed during the enumeration phase (i created a file called users.txt with these names), and a copy of the provided wordlist that comes with backtrack. In that wordlist, we will add the usernames that we obtained just in case the security policy for the network is not enforced and someone decided to use their username as their password. We will also run the ssh module since we already know that the anonymous account is enabled for ftp. Here is what our command looks like:
root@bt:~/Desktop# hydra -L users.txt -P /pentest/passwords/wordlists/darkc0de.lst 192.168.1.14 ssh
Now we wait a while for the scan to finish. I usually start this right after the enumeration phase, this way I am not waiting on it to complete.
It looks like the scan found an anonymous user account enabled for ssh.
[STATUS] attack finished for 192.168.1.14 (waiting for children to finish)
[22][ssh] host: 192.168.1.14 login: anonymous password: anonymous
Hydra (http://www.thc.org/thc-hydra) finished at 2012-08-05 11:22:35
So now we have 2 services that can be used to attack the server. Even though they are anonymous accounts, as long as we have write access we can use this to perform privilege escalation. Next we will perform research about the vulnerability that Nessus reported to see if it is legit. Lets grab the CVE numbers and search google. CVE-2007-4752, and CVE-2007-2243 are the cve numbers that were reported. So if we search google, we find that this is possibly a false positive based on the version number of ssh that was reported to Nessus. The only thing that could be a possible attack vector is a local privilege escalation that can be performed by filling the /tmp directory causing the server to use default authentication cookies. I should probably mention that there is a web site with available exploits that took over the place of Milw0rm. This site is exploit-db, and is handled by the folks at offensive security. Even though this is probably a false positive, it is good to try the local priv attack to see if it works. It is also a good idea to report this finding in a manner that states "outdated ssh software is running it is recommended to upgrade to the most current version". Now we will move on to the exploitation tutorial.