Wrt54g and some things to do with it

Here's a list of various hardware mods that you can perform on your WRT series.
This does not include any Firmware hacks that can be performed on the WRT and various models. I advise the DD-wrt firmware, but there are tons of others as wiki will reflect for the wrt. OpenWRT and tomato are also great alternatives.
http://en.wikipedia.org/wiki/List_of_wireless_router_firmware_projects
Mods included:
==============
+12v Mod
+(fake)POE
+Heat sink Install
+DiY Outdoor enclosure
+Some fun things to do with it.
12v mod: fans, Etc:
===================
With the 12v Mod you simply solder 2 wires under the power plug of the Motherboard. You can use a pin header to make a quick disconnect. When looking at the board upside down (TNC connectors away from you) the negative point is the top point under the power plug, and positive is the lower point.
While this image is not the best representation, you should note the Purple wire is the Positive. You can see that I routed a fan connector above the board from the points and routed the POE off the same points as shown later.

(Fake) POE:
===========
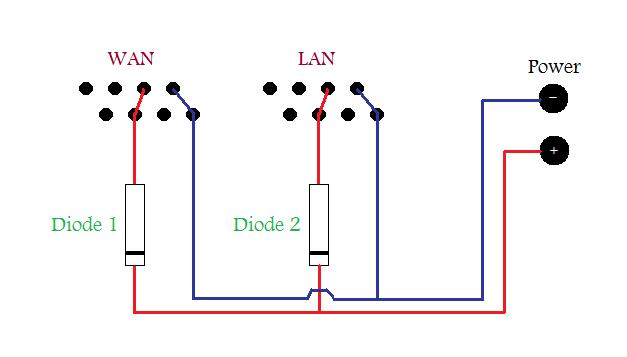
The PoE mod is as easy as the 12v mod, you are using the same points for power.
In this case you are just connecting 4+5 and 7+8 to the + and - rails of the power supply. From there you need to route the power from the Ethernet to the power jack. In my case I used a diode to protect the device from plugging in 12v original power supply and a POE cable. You can use whatever port you want, in this case I used the WAN.
To understand why this is labeled "Fake POE" see the wiki page. http://en.wikipedia.org/wiki/Power_over_Ethernet it has do with the input voltage.

http://www.techidiots.net/pictures/wrt54gs-poe-12v-mod/pinlayout.jpg
http://www.techidiots.net/pictures/wrt54gs-poe-12v-mod/wrtwiring.jpg

A picture of the finished Injector. In my case, I simply converted the cable, but you could use Rj45 keystones and a compatible power plug should you want to disconnect the power supply or cables.

Heat sink install:
=================
When installing Heat sinks there are several places you can install them for various needs. I recommend that you use some thermal epoxy because it will hold the heat sink to the chip permanently rather than normal thermal paste. Make sure you understand what permanent means before proceeding.
The CPU/Main heat sink is to the left of the board on most models. When overclocking above the 240mhz range with the WRT you will most likely need a heat sink. I've run well over 260+ with a decent heat sink combo.
The Wifi chipset can be cooled for pushing the Mw up from the stock range. Stock transmit is 70+ where the max of the firmware is 251mw. If you plan to really run 251mw, you will want to cool this chip. There is a RF shield over the chip, if you want to cool the chip properly, put some paste between the Rf shield and the chip, and then the heat sink on top of the RF shield.
The picture below shows all 3 of the heat sinks installed.

DIY Outdoor Enclosure:
======================
Here's one way to weatherproof your WRT. Normal outdoor wifi enclosures start anywhere from $50 to several hundred, this enclosure will run you about $20 max on parts.
Parts:
Some access point
Tupperware
Wood fence mounts ( see your local hardware store )
Silicone
Stand offs
A mast to mount it on


The POE Mod in combination with the external enclosure results in a single cable install and no hassling with running power to the device in addition to a network cable.
Fun things to do with it:
=========================
AutoAP
------
AutoAp is a great way to manage multiple connections ( that you definitely own ) to the internet over wireless. It will automatically fail between the highest signal AP that you have access to. As long as you have the keys you can connect to multiple AP's as a client and bridge the internal network of the WRT, then AutoAP is for you.
http://www.dd-wrt.com/wiki/index.php/Autoap
Some basic script
\\I'll upload a basic script once I have access to my other test rig.
DDNS
----
DDNS mixed with VPN create a nice way to connect to your AutoAP WRT and corresponding internal networks. You can use multiple providers including DynDns.
[Setup -> DDNS on DD-wrt]
IP over DNS
-----------
Additionally You can enable to daemons for ip over DNS to circumvent various lame hotspot vendors among other things on DD-wrt.
Upgrade your antenna's
----------------------
Stock antennas for the WRT's are 5bi, The antennas on the WRT are RP-TNC. Upgrading antennas in combination with the other firmware + Mw mods will net you a serious gain in terms of performance. In the build pictured 7 dbi antennas were used.
TNC image
http://www.wimacom.com/wifiblog/wp-content/uploads/conectores/RPTNC-Male...
**USE HTTPS for your Management Interface.** While it wont allow backup, there are known vulns with HTTP auth on DD-wrt firmware’s! (see ExploitDb or Milw0rm.)
-----------------------------------------------------------------------------------------------------------------------------
73's
EvX
Some of these images were directly ripped from
http://www.techidiots.net/project-pages/wrt54gs-poe-12v-mod